Difference between revisions of "Absolute ZERO"
m |
|||
| Line 71: | Line 71: | ||
|- | |- | ||
! | ! | ||
| − | ! style = "width: 32pt;" | [[File:2icon0.png|M.Buster|Mega Buster]] | + | ! style = "width: 32pt;" | [[File:2icon0.png|M.Buster|link=Mega Buster]] |
! style = "width: 32pt;" | [[File:2icona1.gif|H.Chaser|link=Hornet Chaser]][[File:2Iconb1.png|H.Pumpkin|link=Haunt Pumpkin]] | ! style = "width: 32pt;" | [[File:2icona1.gif|H.Chaser|link=Hornet Chaser]][[File:2Iconb1.png|H.Pumpkin|link=Haunt Pumpkin]] | ||
! style = "width: 32pt;" | [[File:2icona2.gif|J.Satellite|link=Jewel Satellite]][[File:2Iconb2.png|B.Barrier|link=Badge Barrier]] | ! style = "width: 32pt;" | [[File:2icona2.gif|J.Satellite|link=Jewel Satellite]][[File:2Iconb2.png|B.Barrier|link=Badge Barrier]] | ||
Revision as of 20:48, 4 August 2018
| Absolute ZERO | |||||||||||||||||||||||||||||||||||||

| |||||||||||||||||||||||||||||||||||||
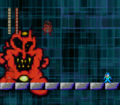
| Phase 1 of Absolute ZERO | |||||||||||||||||||||||||||||||||||||
| |||||||||||||||||||||||||||||||||||||
    
| |||||||||||||||||||||||||||||||||||||
- "It shall be out of the question for yourself to avert me achieving one's goal, in the near future you, my current opponent will peregrinate to your sempiternal rest and indeed oneself will be inclined to exert the effort in this ultimate end and obliteration of all."
- ―Absolute ZERO, throwing the thesaurus at the player.
Absolute ZERO is the true final boss of Make a Good Mega Man Level 2, some sort of massive battle robot piloted by Zero from the first game. He is Zero's ultimate creation.
Contents
Make a Good Mega Man Level 2
Absolute ZERO is the true final boss of the second game, as well as the True Arena's last boss, where he gains a fifth form. As the game's final boss, Zero puts up much more of a fight than in the original MaGMML... Well, initially.
Attacks
Phase 1: The giant hands damage you by themselves. They can barely be jumped over while Absolute ZERO is not moving, but it is recommended to jump over while he is moving in your direction. He can slam the hands, causing explosions that damage you and make the platforms fly up. To dodge this you have to jump when Absolute ZERO slams his hands. When the platforms fall down, he will slam them again, but this time, Crushers will appear from the ceiling. They don't go down when you're near them but damage you if you touch them. To dodge this, you have to jump from the platforms while they are coming down. They will again go up. Then you have to jump to the platform which is not going to a crusher. Next time he slams the platforms, the crushers will switch places. The pattern always goes like this, and once you learn it, Absolute ZERO is a very easy.
Phase 1
Absolute ZERO is revealed to be a giant machine, with a really detailed face that some would say is a JoJo reference. He moves slowly, so he is not a big deal. He has only a few attacks, but they are deadly if you don't know them correctly. His weaknesses are Jewel Satellite/Badge Barrier and Triple Blade/Truffle Cluster.
Phase 2
- todo: also this
Phase 3
- todo: attacks
Unfortunately for Absolute ZERO, reality ensues after prolonged destruction from Mega Man, and Absolute ZERO is effectively crippled. Most of its attacks are incredibly weak now, and the entire fight is incredibly flimsy for Absolute ZERO. Depleting this phase's health bar makes Absolute ZERO let out a totally normal sounding yell, and Phase 4 Begins.
Phase 4
At this point, Absolute ZERO is just as big a joke as the original ZERO fight, as it's just a drawing of ZERO swinging back and forth, occasionally sputtering out a projectile. While the projectile causes knockback, it actually deals no damage to Mega Man. Simply keep firing at it until it dies.
Phase 4 (Alternative)
At the end of the True Arena, Phase 4 plays out a bit differently. It appears to be a Heart at the center as opposed to a drawing of Zero, and while it initially seems to unleash a flurry of projectiles, they actually lack collision altogether and can't even hurt Mega Man. After a few moments, the boss automatically self-destructs. Pat yourself on the back--you won the True Arena!
Gallery

Phase 2 of Absolute ZERO

Phase 3 of Absolute ZERO
Phase 4 of Absolute ZERO

Alternate Phase 4 of Absolute ZERO


Damage Tables
| |
|
|
|
|
|
|
|
|
|
| |
|---|---|---|---|---|---|---|---|---|---|---|---|
| |
1/1/2 | 1 | 2 | 1 | 2 | N | 1 | 1 | 0 | 0 | 0 |
| |
1/1/2 | 2 | 1 | 1 | 1 | N | 1 | 3 | 0 | 0 | 0 |
| |
1/1/3 | 1 | 1 | 1 | 1 | N | 3 | 1 | 0 | 0 | 0 |
| |
1/1/1 | 1 | 1 | 1 | 1 | N | 1 | 1 | 1 | 1 | 1 |
| |
1/1/2 | 0 | 0 | 0 | 0 | N | 0 | 0 | 0 | 0 | 0 |
| Other Notes |
| ||||||||||
| Make a Good Mega Man Level 2 - Tier X | |
|---|---|
| Stages | |
| Coyote Man • Deep Thoughts • Goblins n' Ghasts • Hardcore Parkour • Mario Land • Metallic Ocean • Nightwalk Castle • So Good • Star Road • Swiss Hotel • The Quickening 2 • Wily Fortress VR • Null and Void | |
| List of Bosses | |
| Coyote Man • Alter Man • Air Capsule • Chomp Man • Sheriff Man • Cheat Man • Skullder • Skullder's Revenge • Excalibur Man • Holo Wily • Air Man • Unbeatable Air Man • Toad Man • Toad Man's Revenge • Gigabgyo • Volt Man MK2 • Ronrez • 8 Centipeder Tower | |
| Null and Void Bosses | |
| Boundin' Crash Man • Napalm Man Mk2 • Disco Ball • Copy Hologram • Die Sign • Fire Man • Literally Just a Bee • Twin Cannons • Stone Butterfly | |
| True Final Boss | |
| Absolute ZERO | |