Difference between revisions of "Absolute ZERO"
Camwoodstock (talk | contribs) (→Make a Good Mega Man Level 2: added some elaboration on phases 3-4. get attacks for phases 1-3 and anything else for phases 1-2.) |
TheKman100 (talk | contribs) m (→Trivia) |
||
| (20 intermediate revisions by 11 users not shown) | |||
| Line 1: | Line 1: | ||
{{robotmaster | {{robotmaster | ||
|titlebg=#8D83AB | |titlebg=#8D83AB | ||
| − | |titletext = #FFFFFF | + | |titletext=#FFFFFF |
| − | |name= Absolute ZERO | + | |name=Absolute ZERO |
| − | |image=[[File:MaGMML2-TF-AbsoluteZERO.png]] | + | |image=[[File:MaGMML2-TF-AbsoluteZERO.png|256px]] |
| − | |caption= Phase 1 of Absolute ZERO | + | |caption=Phase 1 of Absolute ZERO |
| − | |script= | + | |script=アブソルートZERO |
| − | |romaji = | + | |romaji=Abusorūto ZERO |
|number= | |number= | ||
| − | |designer= | + | |designer=[[ACESpark]] |
| − | |programmer= [[ | + | |programmer=ACESpark ''(Phases 1-4)''<br>[[snoruntPyro]] ''(Zero Heart)'' |
| − | |gender= Male | + | |gender=Male |
| − | |eyecolor = Yellow | + | |eyecolor=Yellow |
|at= | |at= | ||
| − | |weapon= | + | |weapon= |
| − | |hp= 28 | + | |hp=28 (Phases 1-4)<br>280 (Zero Heart) |
| − | |||
|attack= | |attack= | ||
|type=Unknown | |type=Unknown | ||
| − | |weak= | + | |weak=[[Jewel Satellite]], [[Triple Blade]] (Phase 1)<br>[[Wheel Cutter]] (Phase 2)<br>[[Slash Claw]] (Phase 3)<br>None (Phase 4, Zero Heart) |
| − | |||
| − | |||
| − | |||
| − | Phase | ||
| − | Phase 4 | ||
|affiliations=[[Zero]] | |affiliations=[[Zero]] | ||
| − | |stage=[[Null and Void]] | + | |stage=[[Null and Void (MaGMML2)|Null and Void]] |
| − | |location=[[The True Arena]] | + | |location=[[Null and Void (MaGMML2)|Null and Void]]<br>[[The Arena|The True Arena]] |
|occupation=Battle Robot | |occupation=Battle Robot | ||
|OffAppear= | |OffAppear= | ||
| − | |MaGMMLAppear= [[Make a Good Mega Man | + | |MaGMMLAppear=[[Make a Good Mega Man Level 2|MaGMML2]]<br>(True Final Boss) |
| − | |appear2= | + | |appear2= |
|sprite=[[File:AbsoluteZero1.png]][[File:AbsoluteZero2.png]][[File:AbsoluteZero3.png]][[File:AbsoluteZero4.png]][[File:ZeroHeart.png]] | |sprite=[[File:AbsoluteZero1.png]][[File:AbsoluteZero2.png]][[File:AbsoluteZero3.png]][[File:AbsoluteZero4.png]][[File:ZeroHeart.png]] | ||
}} | }} | ||
| − | {{quote|It shall be out of the question for yourself to avert me achieving one's goal, in the near future you, my current opponent will peregrinate to your sempiternal rest and indeed oneself will be inclined to exert the effort in this ultimate end and obliteration of all.| | + | {{quote|It shall be out of the question for yourself to avert me achieving one's goal, in the near future you, my current opponent will peregrinate to your sempiternal rest and indeed oneself will be inclined to exert the effort in this ultimate end and obliteration of all.|'''Zero'''|throwing the thesaurus at the player}} |
| − | Absolute ZERO is the true final boss of '' | + | '''Absolute ZERO''' is the true final boss of ''[[Make a Good Mega Man Level 2]]''. It is a massive battle robot controlled by [[Zero]], who created it in his visage with the goal of pitting it against [[Mega Man]]. Unlike its creator, Absolute ZERO boasts tremendous power and combat capability. |
| − | + | Absolute ZERO appears at the end of [[Null and Void (MaGMML2)|Null and Void]], but also appears in [[The Arena|The True Arena]], where it will always be the final opponent faced. In the latter, it gains an alternate final phase known as '''Zero Heart'''. | |
| − | Absolute ZERO | ||
| − | == | + | ==Battle== |
====Phase 1==== | ====Phase 1==== | ||
| − | : | + | Bearing a detailed face and a body reminiscent of the canon Zero, Absolute ZERO slowly stomps around the arena following Mega Man, occasionally stopping to attack. It has two invincible arms that deflect all non-piercing attacks, and only the head is vulnerable. It follows a pattern that it will always repeat: First it will slam its arms on the ground, creating harmful explosions and causing the platforms to fly up in a wave from the point of impact. Next, it will stand still and create up to three rebounding projectiles from its head crystal. Finally, it will stomp after Mega Man four times while firing projectiles from its eyes, with each stomp causing a spiked crusher to fall from the ceiling. Though these are non-lethal, the crusher that is directly above Mega Man at the time is guaranteed to fall. |
| + | |||
| + | The first time it slams its arms, the top of the screen is clear. Afterwards, it will be populated with spikes that alternate positions with each slam, making avoiding them as the platforms rise upwards difficult. | ||
====Phase 2==== | ====Phase 2==== | ||
| − | + | After receiving enough damage, Absolute ZERO takes on a feral-looking form, with its hands getting claw-like fingers. As before, it follows a pattern it will constantly repeat. First it will follow Mega Man and attempt to swipe him with each of its arms (first its left, then its right). It follows up by stomping to the centre and spitting a spread of fireballs from the left side of the arena to the right. During this attack, spiked crushers appear at the top of the screen. After this, it quickly stomps after Mega Man, with each stomp causing the crusher directly above Mega Man to fall, as well as creating a set of sparkles directly beneath him. These sparkles quickly shoot a laser upwards that reaches as high as the ceiling. This happens five times before the pattern repeats. | |
| + | |||
| + | As before, only the head is vulnerable; however, the arms now mostly float by either side of it, effectively shielding it from attacks. Other than waiting for it to lower its arms during its swipe attack, Mega Man is forced to stay close to Absolute ZERO in order to damage it. | ||
====Phase 3==== | ====Phase 3==== | ||
| − | + | After prolonged destruction from Mega Man, Absolute ZERO suffers extensive damage that effectively cripples it, causing its threat level (as with its looks) to plummet like a rock. All it can do is stomp back and forth across the arena, firing large electric balls at Mega Man from its remaining arm. These shots are rather slow, but if they impact the ground, they cause the platforms to rise in a wave much as the first phase's arms did. | |
| − | |||
====Phase 4==== | ====Phase 4==== | ||
| − | At this point, | + | Once blasted into the dirt even further, Absolute ZERO degenerates into a giant, more monstrous-looking facsimile of Zero himself. At this point, the robot is just as big a joke as the original Zero fight, as all it does is swing back and forth, occasionally sputtering out a projectile (the same one the first phase shot from its eyes). While the projectile causes knockback, it actually deals no damage to Mega Man. The only other advantage it has is durability, as all weapons (even a Charge Shot) deal exactly one point of damage to it. Mega Man's victory at this point is a forgone conclusion. |
| − | ==== | + | ====Zero Heart==== |
| − | At the end of the True Arena, Phase 4 | + | At the end of the True Arena, Phase 4 will not attack Mega Man, instead pulling it into its mouth and swallowing him whole. Inside the heart of Absolute ZERO is... a literal heart (represented by a giant Heart Tank from the ''Mega Man X'' series) with several healthbars, and while it unleashes a flurry of projectiles (up to and including [[Quick Laser]]s), all of them lack collision altogether, and can't even hurt Mega Man. Zero Heart itself is equally incapable of damaging him, even as it teleports erratically around the arena. After a few moments, the heart automatically self-destructs. |
===Gallery=== | ===Gallery=== | ||
| Line 61: | Line 57: | ||
File:MaGMML2-TF-AbsoluteZERO-2.png|alt=Phase 3|Phase 3 of Absolute ZERO | File:MaGMML2-TF-AbsoluteZERO-2.png|alt=Phase 3|Phase 3 of Absolute ZERO | ||
File:MaGMML2-TF-AbsoluteZERO-3.png|alt=Phase 4|Phase 4 of Absolute ZERO | File:MaGMML2-TF-AbsoluteZERO-3.png|alt=Phase 4|Phase 4 of Absolute ZERO | ||
| − | File:MaGMML2-TF-AbsoluteZERO-4.png|alt= | + | File:MaGMML2-TF-AbsoluteZERO-4.png|alt=Zero Heart|Zero Heart |
</gallery> | </gallery> | ||
==Damage Tables== | ==Damage Tables== | ||
| − | { | + | {| class="wikitable" |
| − | | | + | |- |
| − | | | + | ! |
| − | | | + | ! style = "width: 32pt;" | [[File:2icon0.png|M.Buster|link=Mega Buster]] |
| − | | | + | ! style = "width: 32pt;" | [[File:2icona1.gif|H.Chaser|link=Hornet Chaser]][[File:2Iconb1.png|H.Pumpkin|link=Haunt Pumpkin]] |
| − | | | + | ! style = "width: 32pt;" | [[File:2icona2.gif|J.Satellite|link=Jewel Satellite]][[File:2Iconb2.png|B.Barrier|link=Badge Barrier]] |
| − | | | + | ! style = "width: 32pt;" | [[File:2icona3.gif|G.Buster|link=Grab Buster]][[File:2Iconb3.png|N.Bomb|link=Neapolitan Bomb]][[File:2Iconb11.png|L.Rocket|link=Launch Rocket]] |
| − | | | + | ! style = "width: 32pt;" | [[File:2icona4.gif|T.Blade|link=Triple Blade]][[File:2Iconb4.png|T.Cluster|link=Truffle Cluster]] |
| − | | | + | ! style = "width: 32pt;" | [[File:2icona5.gif|F.Stopper|link=Flash Stopper]][[File:2Iconb5.png|C.Distorter|link=Cyber Distorter]] |
| − | | | + | ! style = "width: 32pt;" | [[File:2icona6.gif|S.Claw|link=Slash Claw]][[File:2Iconb6.png|F.Beam|link=Force Beam]] |
| − | | | + | ! style = "width: 32pt;" | [[File:2icona7.gif|W.Cutter|link=Wheel Cutter]][[File:2Iconb7.png|H.Trapper|link=Hazard Trapper]] |
| − | | | + | ! style = "width: 32pt;" | [[File:2icona8.png|Sakugarne|link=Sakugarne]][[File:2Iconb8.png|M.Blast|link=Match Blast]] |
| − | | | + | ! style = "width: 32pt;" | [[File:2icona9.png|W.Adaptor|link=Wire Adaptor]][[File:2Iconb9.png|C.Claw|link=Chomp Claw]] |
| − | + | ! style = "width: 32pt;" | [[File:2icona10.png|S.Arrow|link=Super Arrow]] | |
| − | + | |- style="text-align:center;" | |
| − | + | | [[File:AbsoluteZEROMugshot1.png|Phase 1]] | |
| − | | | + | | 1/1/2 |
| − | | | + | | 1 |
| − | | | + | | 2 |
| − | | | + | | 1 |
| − | | | + | | 2 |
| − | | | + | | N |
| − | | | + | | 1 |
| − | | | + | | 1 |
| − | | | + | | 0 |
| − | | | + | | 0 |
| − | | | + | | 0 |
| − | | | + | |- style="text-align:center;" |
| − | + | | [[File:AbsoluteZEROMugshot2.png|Phase 2]] | |
| − | + | | 1/1/2 | |
| − | + | | 2 | |
| − | | | + | | 1 |
| − | | | + | | 1 |
| − | | | + | | 1 |
| − | | | + | | N |
| − | | | + | | 1 |
| − | | | + | | 3 |
| − | | | + | | 0 |
| − | | | + | | 0 |
| − | | | + | | 0 |
| − | | | + | |- style="text-align:center;" |
| − | | | + | | [[File:AbsoluteZEROMugshot3.png|Phase 3]] |
| − | | | + | | 1/1/3 |
| − | + | | 1 | |
| + | | 1 | ||
| + | | 1 | ||
| + | | 1 | ||
| + | | N | ||
| + | | 3 | ||
| + | | 1 | ||
| + | | 0 | ||
| + | | 0 | ||
| + | | 0 | ||
| + | |- style="text-align:center;" | ||
| + | | [[File:AbsoluteZEROMugshot4.png|Phase 4]] | ||
| + | | 1/1/1 | ||
| + | | 1 | ||
| + | | 1 | ||
| + | | 1 | ||
| + | | 1 | ||
| + | | N | ||
| + | | 1 | ||
| + | | 1 | ||
| + | | 1 | ||
| + | | 1 | ||
| + | | 1 | ||
| + | |- style="text-align:center;" | ||
| + | | [[File:ZeroHeartMugshot.png|Zero Heart]] | ||
| + | | 1/1/2 | ||
| + | | 0 | ||
| + | | 0 | ||
| + | | 0 | ||
| + | | 0 | ||
| + | | N | ||
| + | | 0 | ||
| + | | 0 | ||
| + | | 0 | ||
| + | | 0 | ||
| + | | 0 | ||
| + | |- | ||
| + | | colspan="2" |'''Other Notes''' | ||
| + | | colspan="10" | | ||
| + | |} | ||
| − | + | ==Unused Content== | |
| − | + | * Among the sprites created for Absolute ZERO was one for a fourth phase resembling a hybrid of Zero's canon and ''MaGMML'' designs, intended to go between the final game's third and fourth/final phases. This phase was dropped as ACESpark felt it was unnecessary to have a third joke phase. | |
| − | + | * The final version of Daisy Bell in ''MaGMML2'' uses a recording from 1894, sung by Edward M. Favor, combined with a stock music track. Prior to this, ACESpark attempted to make their own recording through synthesised singing, but their various attempts felt too "creepy" and unpolished to use. These can be heard at the links below:<br> | |
| − | + | {| class="wikitable" | |
| − | + | |- style="text-align:center;" | |
| − | + | | colspan="2" | [[File:AbsoluteZeroUnusedPhase4.png|frameless|center|The unused Phase 4]] | |
| − | + | The unused Phase 4. | |
| − | + | |- style="text-align:center;" | |
| − | + | ! colspan="2" |Unused Music Tests | |
| − | + | |- | |
| − | + | |[https://magmmlcontest.com/magmml2/AbsoluteZeroSingingTest.ogg AbsoluteZeroSingingTest.ogg] | |
| − | + | |[https://magmmlcontest.com/magmml2/AbsoluteZeroSingingTest2.ogg AbsoluteZeroSingingTest2.ogg] | |
| − | + | |} | |
| − | |||
| − | |||
| − | |||
| − | { | ||
| − | | | ||
| − | | | ||
| − | | | ||
| − | | | ||
| − | |||
| − | | | ||
| − | |||
| − | | | ||
| − | | | ||
| − | | | ||
| − | | | ||
| − | | | ||
| − | } | ||
| − | |||
| + | ==Notes== | ||
| + | * Absolute ZERO is loosely based on the "increasingly verbose" meme, in which a phrase from pop culture is twisted to become longer and wordier as the accompanying image becomes lower and lower in quality (represented here by Absolute ZERO's appearance starting off handsome, then growing increasingly more ridiculous until it becomes a monstrous version of the ''MaGMML'' series' Zero). | ||
| + | * The use of Daisy Bell for the final phase is a reference to HAL 9000's death in the film ''2001: A Space Odyssey'', where the antagonistic computer sings the song as it is being slowly deactivated. This is itself a reference as Daisy Bell was the first song to be "sung" by a computer, in 1961. | ||
| + | <br> | ||
{{MaGMML2 Tier X}} | {{MaGMML2 Tier X}} | ||
{{MaGMML2}} | {{MaGMML2}} | ||
| − | [[ | + | [[Category:Bosses]][[Category:Make a Good Mega Man Level 2 Bosses]][[Category:Final Bosses]][[Category:Tier X (MaGMML2)]] |
Latest revision as of 20:38, 20 March 2025
| Absolute ZERO | |||||||||||||||||||||||||||||||||||||||||

| |||||||||||||||||||||||||||||||||||||||||
| Phase 1 of Absolute ZERO | |||||||||||||||||||||||||||||||||||||||||
| |||||||||||||||||||||||||||||||||||||||||
    
| |||||||||||||||||||||||||||||||||||||||||
- "It shall be out of the question for yourself to avert me achieving one's goal, in the near future you, my current opponent will peregrinate to your sempiternal rest and indeed oneself will be inclined to exert the effort in this ultimate end and obliteration of all."
- ―Zero, throwing the thesaurus at the player
Absolute ZERO is the true final boss of Make a Good Mega Man Level 2. It is a massive battle robot controlled by Zero, who created it in his visage with the goal of pitting it against Mega Man. Unlike its creator, Absolute ZERO boasts tremendous power and combat capability.
Absolute ZERO appears at the end of Null and Void, but also appears in The True Arena, where it will always be the final opponent faced. In the latter, it gains an alternate final phase known as Zero Heart.
Contents
Battle
Phase 1
Bearing a detailed face and a body reminiscent of the canon Zero, Absolute ZERO slowly stomps around the arena following Mega Man, occasionally stopping to attack. It has two invincible arms that deflect all non-piercing attacks, and only the head is vulnerable. It follows a pattern that it will always repeat: First it will slam its arms on the ground, creating harmful explosions and causing the platforms to fly up in a wave from the point of impact. Next, it will stand still and create up to three rebounding projectiles from its head crystal. Finally, it will stomp after Mega Man four times while firing projectiles from its eyes, with each stomp causing a spiked crusher to fall from the ceiling. Though these are non-lethal, the crusher that is directly above Mega Man at the time is guaranteed to fall.
The first time it slams its arms, the top of the screen is clear. Afterwards, it will be populated with spikes that alternate positions with each slam, making avoiding them as the platforms rise upwards difficult.
Phase 2
After receiving enough damage, Absolute ZERO takes on a feral-looking form, with its hands getting claw-like fingers. As before, it follows a pattern it will constantly repeat. First it will follow Mega Man and attempt to swipe him with each of its arms (first its left, then its right). It follows up by stomping to the centre and spitting a spread of fireballs from the left side of the arena to the right. During this attack, spiked crushers appear at the top of the screen. After this, it quickly stomps after Mega Man, with each stomp causing the crusher directly above Mega Man to fall, as well as creating a set of sparkles directly beneath him. These sparkles quickly shoot a laser upwards that reaches as high as the ceiling. This happens five times before the pattern repeats.
As before, only the head is vulnerable; however, the arms now mostly float by either side of it, effectively shielding it from attacks. Other than waiting for it to lower its arms during its swipe attack, Mega Man is forced to stay close to Absolute ZERO in order to damage it.
Phase 3
After prolonged destruction from Mega Man, Absolute ZERO suffers extensive damage that effectively cripples it, causing its threat level (as with its looks) to plummet like a rock. All it can do is stomp back and forth across the arena, firing large electric balls at Mega Man from its remaining arm. These shots are rather slow, but if they impact the ground, they cause the platforms to rise in a wave much as the first phase's arms did.
Phase 4
Once blasted into the dirt even further, Absolute ZERO degenerates into a giant, more monstrous-looking facsimile of Zero himself. At this point, the robot is just as big a joke as the original Zero fight, as all it does is swing back and forth, occasionally sputtering out a projectile (the same one the first phase shot from its eyes). While the projectile causes knockback, it actually deals no damage to Mega Man. The only other advantage it has is durability, as all weapons (even a Charge Shot) deal exactly one point of damage to it. Mega Man's victory at this point is a forgone conclusion.
Zero Heart
At the end of the True Arena, Phase 4 will not attack Mega Man, instead pulling it into its mouth and swallowing him whole. Inside the heart of Absolute ZERO is... a literal heart (represented by a giant Heart Tank from the Mega Man X series) with several healthbars, and while it unleashes a flurry of projectiles (up to and including Quick Lasers), all of them lack collision altogether, and can't even hurt Mega Man. Zero Heart itself is equally incapable of damaging him, even as it teleports erratically around the arena. After a few moments, the heart automatically self-destructs.
Gallery

Phase 2 of Absolute ZERO

Phase 3 of Absolute ZERO
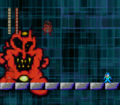
Phase 4 of Absolute ZERO

Zero Heart


Damage Tables

|
 
|
 
|
  
|
 
|
 
|
 
|
 
|
 
|
 
|

| |
|---|---|---|---|---|---|---|---|---|---|---|---|

|
1/1/2 | 1 | 2 | 1 | 2 | N | 1 | 1 | 0 | 0 | 0 |

|
1/1/2 | 2 | 1 | 1 | 1 | N | 1 | 3 | 0 | 0 | 0 |

|
1/1/3 | 1 | 1 | 1 | 1 | N | 3 | 1 | 0 | 0 | 0 |

|
1/1/1 | 1 | 1 | 1 | 1 | N | 1 | 1 | 1 | 1 | 1 |

|
1/1/2 | 0 | 0 | 0 | 0 | N | 0 | 0 | 0 | 0 | 0 |
| Other Notes | |||||||||||
Unused Content
- Among the sprites created for Absolute ZERO was one for a fourth phase resembling a hybrid of Zero's canon and MaGMML designs, intended to go between the final game's third and fourth/final phases. This phase was dropped as ACESpark felt it was unnecessary to have a third joke phase.
- The final version of Daisy Bell in MaGMML2 uses a recording from 1894, sung by Edward M. Favor, combined with a stock music track. Prior to this, ACESpark attempted to make their own recording through synthesised singing, but their various attempts felt too "creepy" and unpolished to use. These can be heard at the links below:
 The unused Phase 4. | |
| Unused Music Tests | |
|---|---|
| AbsoluteZeroSingingTest.ogg | AbsoluteZeroSingingTest2.ogg |
Notes
- Absolute ZERO is loosely based on the "increasingly verbose" meme, in which a phrase from pop culture is twisted to become longer and wordier as the accompanying image becomes lower and lower in quality (represented here by Absolute ZERO's appearance starting off handsome, then growing increasingly more ridiculous until it becomes a monstrous version of the MaGMML series' Zero).
- The use of Daisy Bell for the final phase is a reference to HAL 9000's death in the film 2001: A Space Odyssey, where the antagonistic computer sings the song as it is being slowly deactivated. This is itself a reference as Daisy Bell was the first song to be "sung" by a computer, in 1961.
| Make a Good Mega Man Level 2 - Tier X | |
|---|---|
| Stages | |
| Coyote Man • Deep Thoughts • Goblins n' Ghasts • Hardcore Parkour • Mario Land • Metallic Ocean • Nightwalk Castle • So Good • Star Road • Swiss Hotel • The Quickening 2 • Wily Fortress VR • Null and Void | |
| List of Bosses | |
| Coyote Man • Alter Man • Air Capsule • Chomp Man • Sheriff Man • Cheat Man • Skullder • Skullder's Revenge • Excalibur Man • Holo Wily • Air Man • Unbeatable Air Man • Toad Man • Toad Man's Revenge • Gigabgyo • Volt Man MK2 • Ronrez • 8 Centipeder Tower | |
| Null and Void Bosses | |
| Boundin' Crash Man • Napalm Man Mk2 • Disco Ball • Copy Hologram • Die Sign • Fire Man • Literally Just a Bee • Twin Cannons • Stone Butterfly | |
| True Final Boss | |
| Absolute ZERO | |
